
How to Make Servo Robotic Arm using Arduino. YouTube
Make sure that the limits of the motors reach their physical boarders. The default positions of the arm at power-on are: servo 0: 90. servo 1: 120. servo 2: 90. servo 3: 120. servo 4: 120. servo 5: 0. The Arduino is used only to get USB frames sent from the PC an navigate the motors of that drive the arm accordingly.

Simple & Smart Robotic Arm Using Arduino Robot arm, Learn robotics, Arduino
To set up the ROS package on your host machine, follow the steps in the previous article Robotic Arm Simulation in Robot Operating System (ROS) and setup ROS, create a ROS workspace and install the ROS package provided here. The robot-arm-control-ros ROS package has this file structure: File Structure for the ROS package- (Image Source.

How to make Micro Servo Robotic arm arduino based simple DIY Robot arm, Easy diy, Arduino
Robot Sederhana Latar Belakang. Membuat robot sederhana dengan sensor ultrasonik, dua buah motor DC dengan driver L293 dan 3 buah sensor Ultrasonik ini adalah permintaan dari teman visitor mikroavr.com, alih alih ternyata orang medan juga, sama dengan saya. Semua sudah ada, termasuk robot nya, saya hanya di minta buat program nya saja.

diy robot arm arduino Terrie Pleasant
Robot Lengan (ARM ROBOT) ARDUINORevisi gerakan servo yaitu Servo 1 untuk gerak kanan kiri, servo 2 untuk gerak maju mundur, servo 3 untuk gerak naik turun da.

HOW TO Make DIY Robot Arm DIY Kit for Arduino YouTube
#arluxmanIni adalah tutorial cara mensimulasikan gambar rangkaian arduino dengan software Proteus dan Arduino IDEDownload sample gambar proteous : https://ww.
Simple and Smart Robotic Arm Using Arduino Arduino Project Hub
Jenis robot ini dapat dijumpai di pabrik/industri otomotif dengan fungsi pengelasan maupun perakitan. Nah kita akan membuat yang sederhana saja, untuk memahami kontrol robot Arm. Sebagai penggerak dasar adalah motor servo. Cara kontrol motor servo dapat juga dilihat disini. Robot Arm yang akan kita kontrol merupakan robot Arm dengan jumlah.
CARA MEMBUAT ROBOT ARM SELEKSI WARNA DENGAN ARDUINO BATECH CREATIVITY
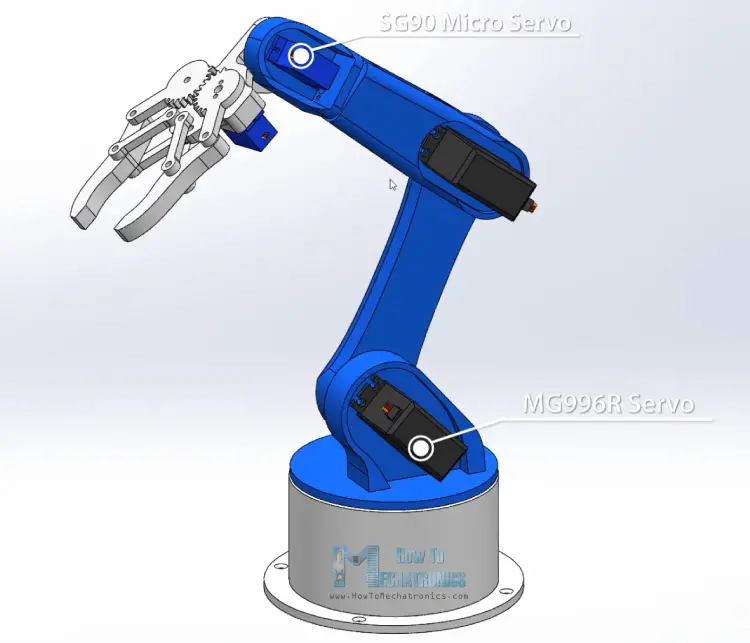
Continuously adjustable "elbow" over a 180 degree vertical axis. Continuously adjustable "finger pinch" or Grip over a 90 degree vertical axis. Continuously adjustable "arm" over a 180 degree horizontal plane. Entire robotic system or the crane arm is movable and maneuvaerable like a remote controlled car.

Cara Membuat Robot Arm Dengan Arduino
How to Test the Smart Robot Arm. After uploading the code to the board, open the 'Serial Monitor'. (Click the magnifying glass in the top right corner, or go under Tools > Serial Monitor.) When the Serial Monitor starts, the Arduino will reset. Now you can control the robotic arm using the master arm.
How To Build A Simple Arduino Robotic Arm (Full DIY Tutorial From Scratch) YouTube
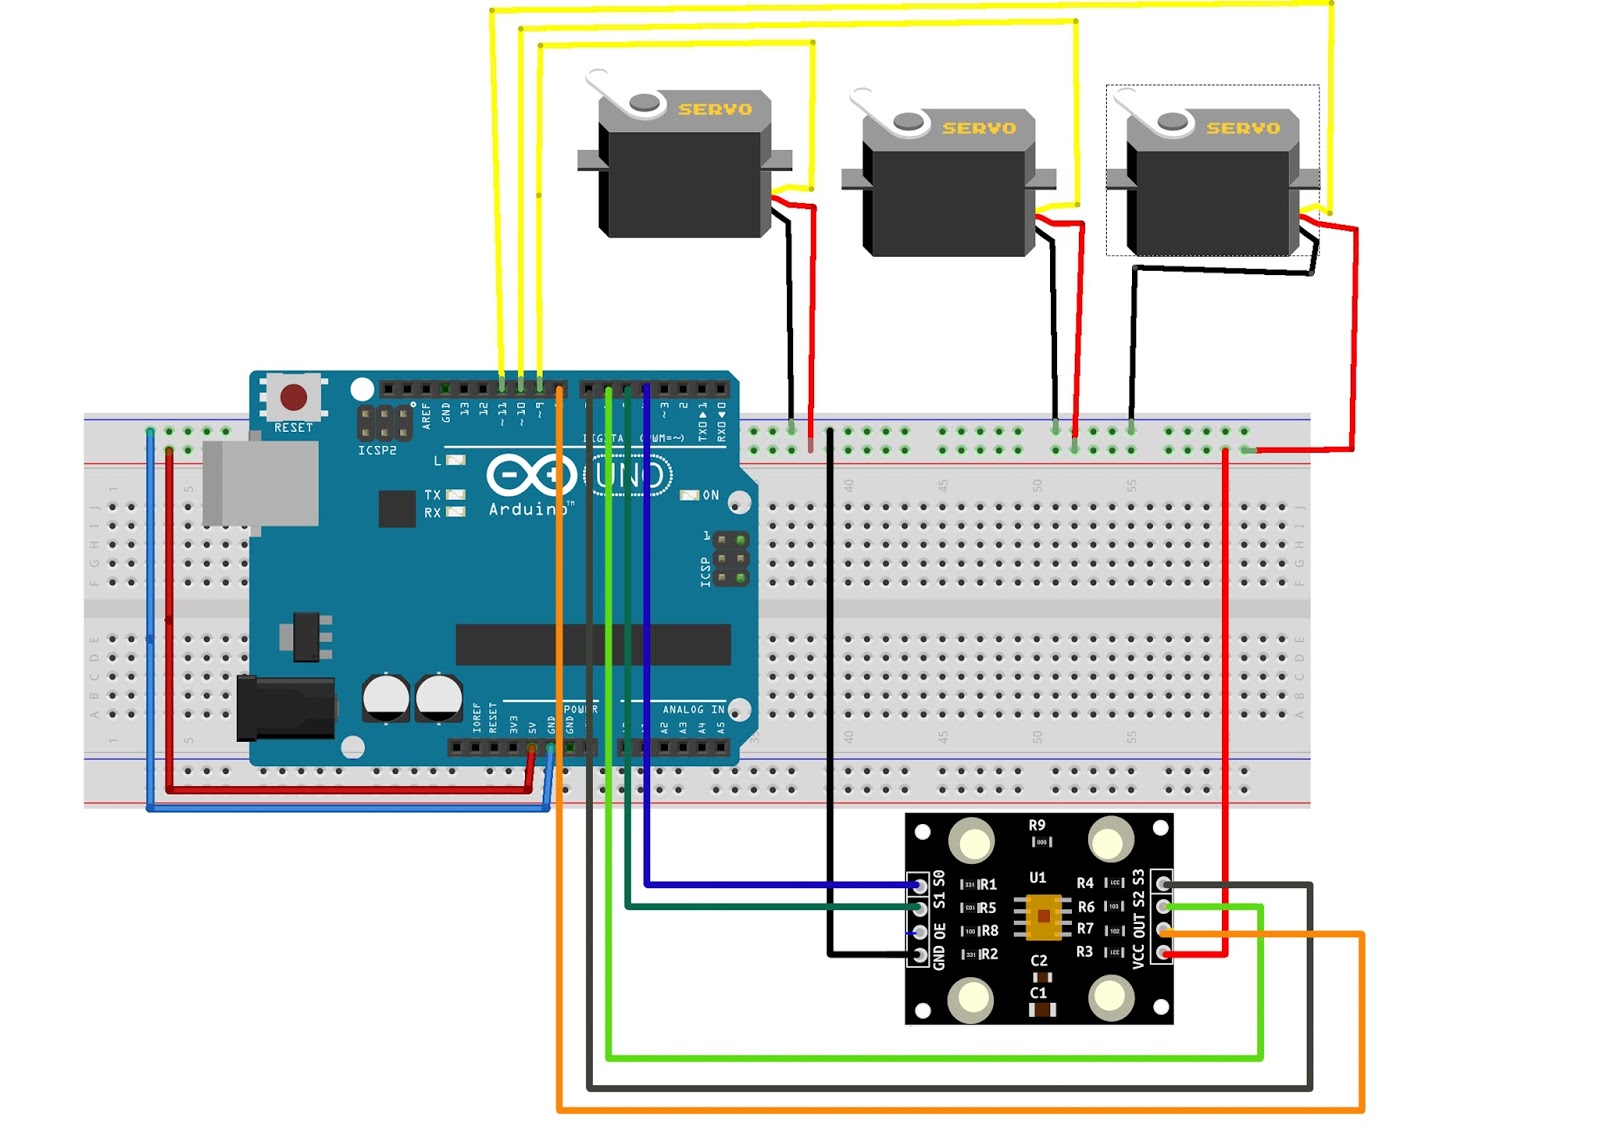
Dalam project ini kami membuat robotic arm yang berfungsi untuk memindahkan benda-benda yang berdiameter 3cm dari tempat satu kesisi tempat lain, dengan dikendalikan oleh joystick. Untuk membuat robotic arm dibutuhkan alat dan bahan sebagai berikut : 3 Buah Servo; 1 Buah micro servo; 1 Buah bread board; 1 Buah Arduino; Jumper Secukupnya; Kabel USB
DIY Arduino Robot Arm with Smartphone Control How To Mechatronics
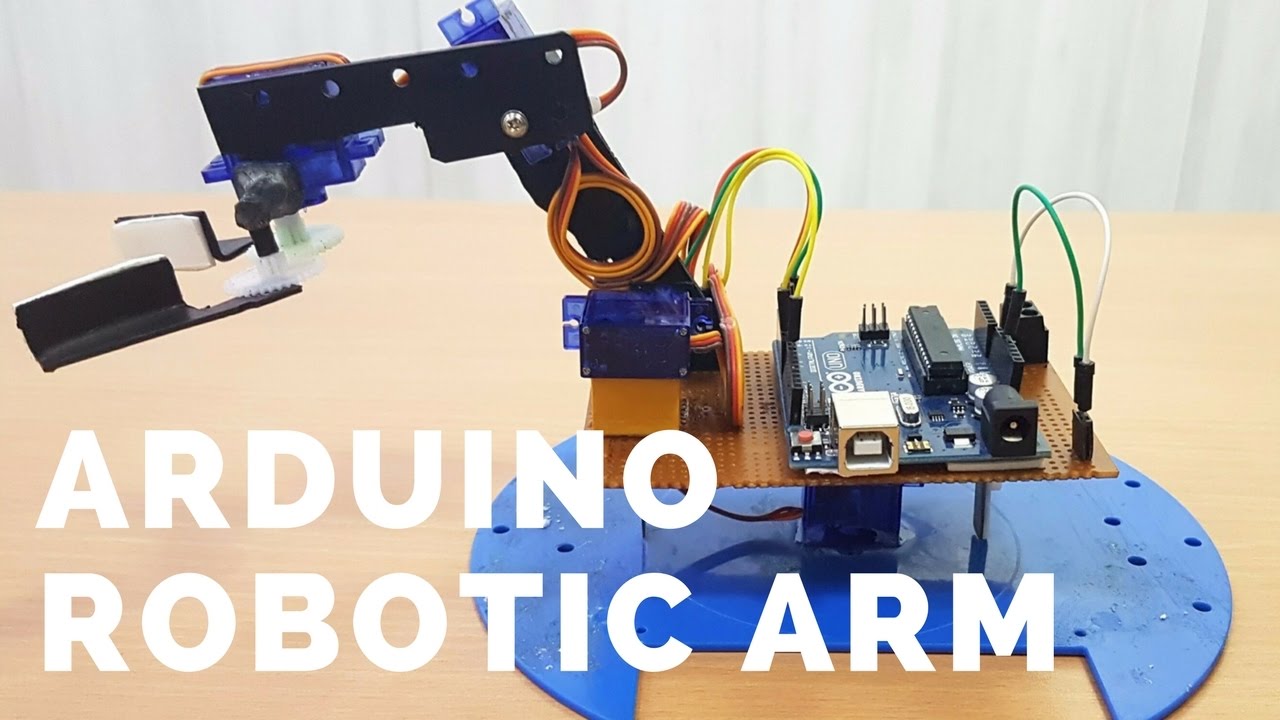
Membuat Robot Lengan (ARM) Menggunakan Arduino. Pada kesempatan yang berbahagia kali ini saya akan menjelaskan mengenai bagaimana cara membuat sebuah robot yang bisa meniru kinerja dari tangan manusia yaitu robot lengan atau robot arm. robot ini menggunakan 5 buah servo mini yang disusun rapi sehingga tiap servo akan mewakili suatu gerakan yang.
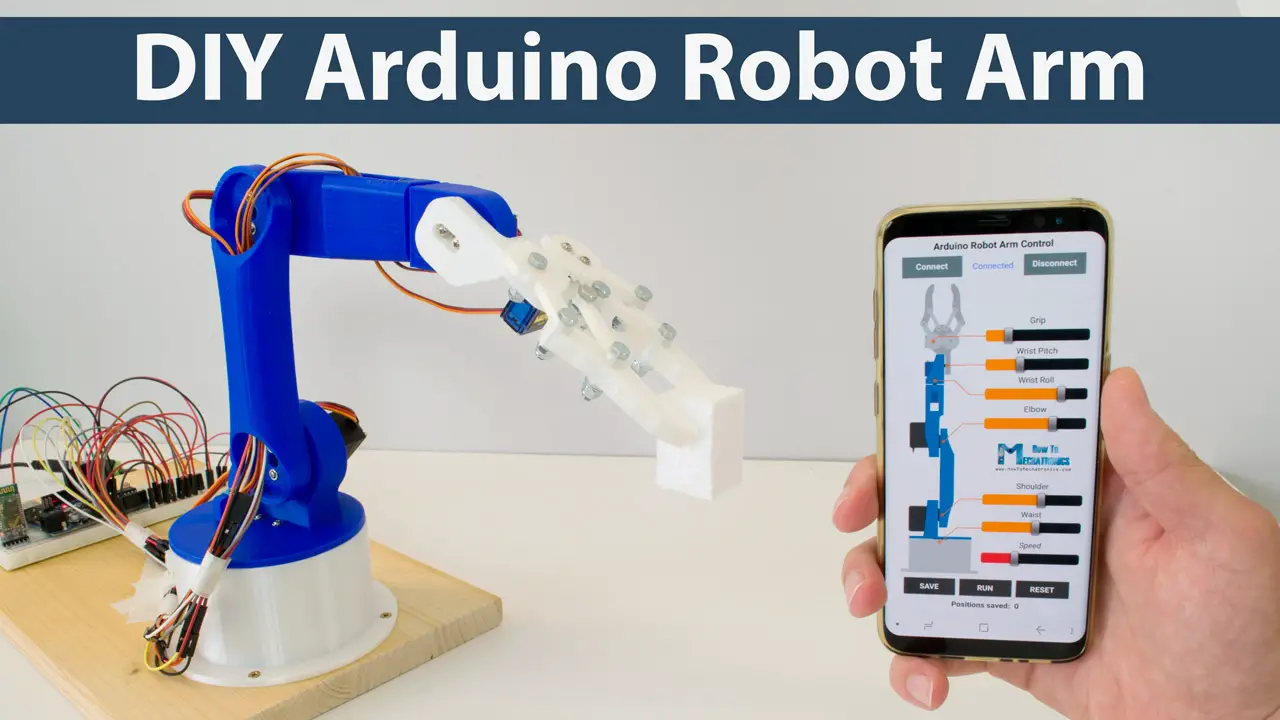
DIY Arduino Robot Arm with Smartphone Control How To Mechatronics
To do this, connect the IR module to the Arduino's analog pins and check the values received in the serial monitor. Then find the corresponding values when an object is in front of the IR sensor. You can use this code to check the IR modules and DC motors: int value; void setup(){. Serial.begin(9600); }
Arduino Robotic Arm Controlled by Touch Interface 13 Steps (with Pictures) Instructables
Nama : ArmDuino. Degree : 4 DOF (Degree of Freedom) Material body : Acrylic 3 mm, laser cutting. Dimensi : 28 x 10,5 x 20 cm. Berat : 900 gr. MCU : Arduino UNO R3 DIP. Control 1 : 4 Analog potensiometer. Control 2 : Joystick. Control 3 : Android (via Bluetooth)
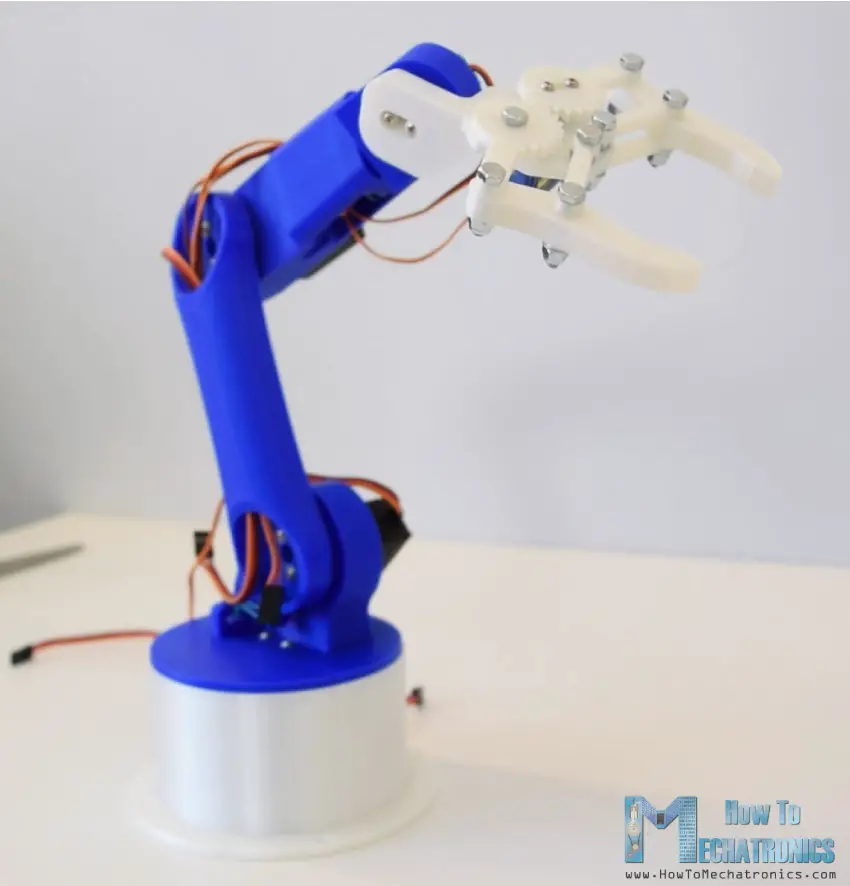
DIY Arduino Robot Arm with Smartphone Control HowToMechatronics
Halo temen2.. selamat berjumpa di channel saya. pada video kali ini kita akan membuat sebuah *robot tank* dengan dilengkapi dengan lengan penjapit. dan robot.

How to make Arduino Robot Arm YouTube
This instructable is a hand-in for a school project that we made. The purpose of this project was to create a robot arm control using thumbsticks. We had to use an Arduino Uno for the control and in addition, we had to implement some sort of actuator or sensor in the setup. We modified a Logitech gamepad using the two thumbsticks.

DIY Arduino Robotic Arm Project With Circuit Diagram Code vlr.eng.br
Pengantar Halo pembaca! Pada artikel ini, kita akan membahas cara membuat robot arm menggunakan Arduino. Robot arm adalah salah satu inovasi teknologi yang menarik, dan dengan bantuan Arduino, Anda dapat membangun sendiri robot arm yang berfungsi. Kami akan menjelaskan langkah-langkah rinci tentang bagaimana mengatur, menghubungkan, dan mengontrol robot arm menggunakan Arduino. Dalam tutorial.
How to assemble and control a robot arm with an Arduino SriTu Hobby
Ternyata rakit robot itu mudah.!! cara membuat robot servo ini menggunakan motor servo dan arduino nano, kalian juga bisa menggunakan arduino uno.silahkan do.